
Baselines and Ablations for Reinforcement Learning Experiments
You changed two things at once. The agent got better. And now you have no idea which change earned the improvement.

Key topics
You changed two things at once. The agent got better. And now you have no idea which change earned the improvement.
This is the most common trap in reinforcement learning experiments. A better score feels like proof that your idea worked. It is not. It is evidence that something changed—and unless you designed the comparison carefully, that something could be noise, a lucky seed, or the other modification you barely noticed.
The fix is to stop treating experiments as contests and start treating them as attribution problems. Your job is not to prove your method wins. Your job is to prove which design choice made it win. Two tools do that work: baselines and ablations.
Why a Better Score Is Not a Better Idea
Reinforcement learning has a property that makes casual comparison dangerous: the agent generates its own training data by interacting with the environment. Change the random seed and the agent explores differently, collects different experiences, and learns a different policy. Run the same algorithm twice with identical settings and you will get two different learning curves.
This means a single improved run can be pure luck. A final-score snapshot can catch your method on a good day and your baseline on a bad one. If you evaluate once, you are not measuring an improvement. You are sampling from a noisy distribution and hoping you got lucky.
The real question is never "did it get better?" It is "which change made it better?" That question requires a controlled comparison, not a victory lap.
If you have not already built evaluation habits around multiple seeds and full learning curves, that foundation comes first. This article assumes you can evaluate an agent reliably. The next step is learning how to compare designs so the results tell you something you can reuse.
Baselines: The Reference Point That Makes a Claim Testable
A baseline is the reference system you compare against. It answers one question: compared to what? An ablation is a deliberately altered version of a method, used to test whether one specific component earns its keep. The two labels answer different questions, and keeping them separate matters.
A baseline is not a "bad" version of your idea, and it is not a strawman you can beat by handicapping it. It is the honest reference point that makes your claim testable. You need several kinds of reference points, and they serve different purposes:
| Reference condition | What it is | What it establishes |
|---|---|---|
| Standard algorithm | A well-known method like PPO or DQN with sensible defaults | Whether your method competes with established practice |
| Random or untrained policy | An agent that acts randomly or has not learned yet | Whether the environment is learnable and the reward signal carries information |
| Full method minus one component | Your approach with a single piece removed | Whether that specific component contributes |
The last row is where beginners get confused. A version of your method with one component removed is an ablation when your question is "does this component matter?" It becomes a baseline when your question is "does the full method beat this simpler version?" Same configuration, different role depending on the claim you are testing.
The most common mistake is tuning your method carefully while leaving the baseline at default settings, then reporting the gap as insight. That gap mostly measures your tuning effort, not your idea. The fairness rule is blunt: spend as much time tuning your baseline as you spend tuning your method. Hold everything else equal—environment, evaluation procedure, compute budget, model capacity.
Here is a decision rule I use constantly: if you would not report the baseline's result in your write-up, do not trust the comparison. A baseline you are embarrassed to show is a baseline designed to lose.
Knowledge check
Check your understanding
Answer this question before you continue.
Ablations: Turning One Bundled Claim into Several Testable Ones
Any method that combines several changes is really several claims in disguise. Say you add reward shaping and a new exploration schedule, and the agent improves. Which change mattered? You cannot know from the combined result. Maybe the exploration schedule did all the work and the reward shaping added nothing. Maybe they only work together. Maybe reward shaping alone would have hurt.
An ablation removes or swaps one design element while keeping everything else fixed. It is the tool that separates those possibilities.
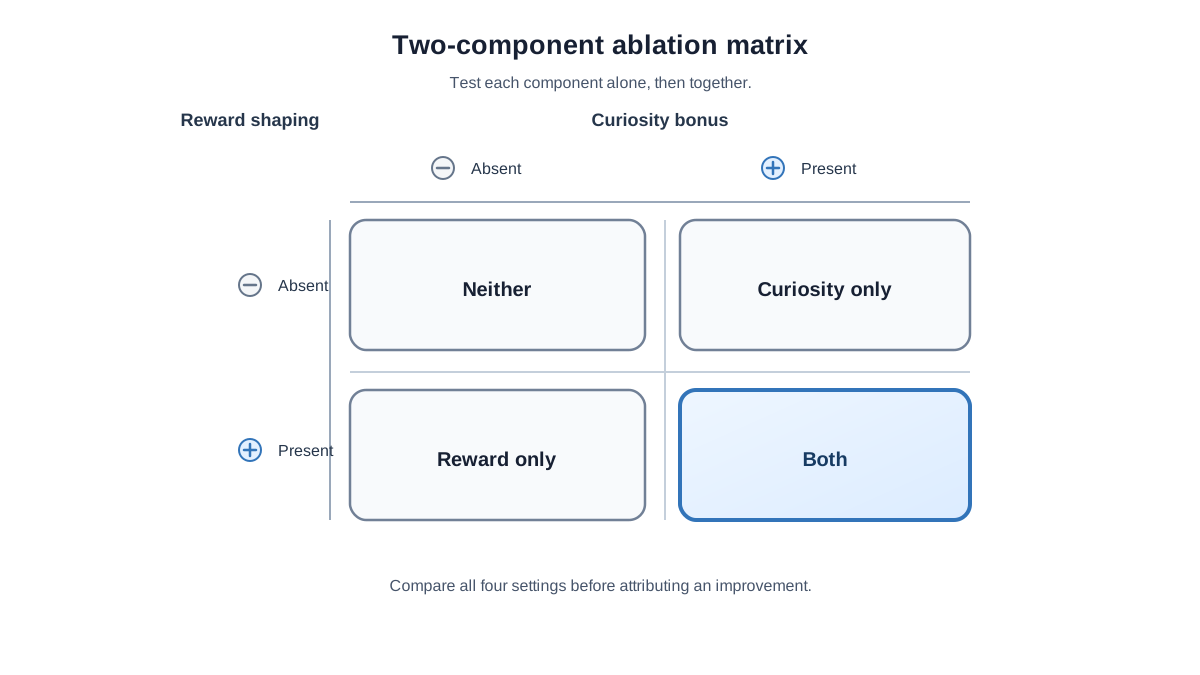
Here is a concrete example. You are training an agent with two additions: a shaped reward that gives small progress signals, and a curiosity bonus that encourages visiting unfamiliar states. The full method learns faster than your baseline. Good. Now run three more conditions:
- Your method without the reward shaping
- Your method without the curiosity bonus
- Your baseline with neither
If removing the curiosity bonus causes performance to collapse but removing reward shaping changes nothing, the result supports a specific attribution: the curiosity bonus contributed under these conditions, while the reward shaping showed no detectable contribution in this comparison. That is an attribution you can build on. Without the ablations, you would have credited the wrong component and carried useless complexity into the next experiment.
One warning: a single ablation that shows no drop does not prove a component is useless. Components can interact. A feature may look redundant alone but become essential when another change is present. If your ablation shows no effect, test the component in combination with the other changes before discarding it.
Knowledge check
Check your understanding
Answer this question before you continue.
Designing a Comparison That Is Actually Controlled
A controlled RL experiment does not require a compute cluster. It requires discipline. Here is a workflow that fits on one machine and produces results you can trust.
Start with one-component ablations for a small claim. If you added two components, remove each one separately. This tells you what each piece contributes on its own.
Add a combined condition when components may interact. If you suspect the reward shaping only helps because the curiosity bonus drives the agent into states where shaping matters, run the full method against the version with each component removed. When the full method beats both single-removal versions, you have evidence the components work together.
Use a small matrix when the interaction is the question. For two binary components, a 2×2 comparison—neither, A only, B only, both—shows you not just whether each component helps, but whether the whole is greater than the sum of its parts.
The rule is not "change one thing at a time." The rule is: know what your comparison can and cannot attribute. A one-component ablation attributes cleanly. A combined condition attributes to the combination. A 2×2 matrix separates component effects from interaction effects. Choose the design that matches the claim you want to make.
Hold everything else fixed. The environment, seed protocol, evaluation procedure, and hyperparameters must stay identical across conditions. If you compare two representation architectures, keep model capacity and compute roughly equal. If you compare two reward functions, keep the algorithm and exploration schedule identical. The boring details are the experiment.
Run multiple seeds and show the spread. A mean across five seeds hides whether your method is consistently better or just less unlucky. Plot the learning curves with the variance visible. A method whose improvement is smaller than its run-to-run noise is not an improvement.
A practical template for most comparisons:
- Baseline condition (standard algorithm, honestly tuned)
- Your full method
- One ablation per component you added
- A combined condition when you suspect interaction
That is four to five conditions for a method with two novel pieces. Each condition runs across the same seeds. The whole experiment is a few hours of compute and gives you a result you can actually interpret.
Knowledge check
Check your understanding
Answer this question before you continue.
Interpreting What Comes Out
Once the runs finish, read the results through the lens of what each condition can prove:
| Observed result | What it supports | What to do next |
|---|---|---|
| Performance drops when a component is removed | That component contributed under these conditions | Keep it; test whether it also helps with other components |
| No change when a component is removed | No detectable contribution in this comparison | Test it in combination before discarding it |
| Full method beats every single-removal version | The components work together | The interaction is your real finding; investigate why |
| Improvement is smaller than seed-to-seed variance | No reliable effect yet | Add seeds or lengthen training before drawing conclusions |
The last row matters more than beginners expect. If your method's advantage over the baseline is smaller than the noise between seeds, you have not found an improvement. You have found a trend that needs more evidence.
Knowledge check
Check your understanding
Answer this question before you continue.
Common Mistakes That Break Attribution
These failures appear constantly in reinforcement learning experiments. Each one has a visible symptom.
Comparing against a paper's published number. Published results come from specific environments, hyperparameters, and compute budgets. Unless you replicate those exact conditions, the comparison is meaningless. Run your own baseline under your own conditions.
Tuning your method but not your baseline. Symptom: your method beats the baseline by a suspiciously large margin on the first try. That gap is tuning effort, not insight.
Reporting the best seed. Symptom: you ran five seeds, one looked great, and you report that one. Precommit to your final runs before you launch them, and report whatever comes out.
Changing the environment or reward between conditions. Symptom: you "fixed" a bug in the environment halfway through the experiment and did not rerun the earlier conditions. Every condition must face the identical task.
Reading one point on the learning curve. Symptom: your method looks better at step 100,000 but was worse for the first 80,000 steps. The whole trajectory matters, not the snapshot.
Each of these mistakes produces the same outcome: a result that looks like evidence and is actually an artifact. The cost is not just a wrong conclusion. It is a wrong conclusion you will build the next experiment on.
A Minimal Workflow for Your Next Experiment
When you design your next comparison, follow this sequence:
Step 1: State the single claim you want to test. Write it down. "Curiosity bonuses improve sample efficiency on sparse-reward tasks" is a claim. "My method is better" is not.
Step 2: Pick a baseline you would be willing to report honestly. If you would not show the baseline's learning curve to a colleague, pick a different baseline.
Step 3: Choose the comparison design that matches your claim. One-component ablations for a small claim. A combined condition when components may interact. A 2×2 matrix when the interaction itself is the question.
Step 4: Run every condition across the same seeds. Hold everything else fixed. Plot learning curves with the spread visible.
Step 5: Precommit to reporting whatever comes out. Decide your evaluation criteria before you launch the final runs. Do not let the results choose the criteria for you.
Full rigor is not required for every experiment. Quick sanity checks and debugging runs do not need five seeds and a complete ablation matrix. But any claim you will trust, share, or build on does.
Here is your next move. Take one experiment you have already run—the one where you changed several things and got a better score. Identify the single claim it was meant to test. Then rebuild it as a baseline-plus-ablation comparison across multiple seeds. Run it. Look at the spread. Find out which change actually earned the improvement.
A result you cannot attribute is a result you cannot reuse. An experiment that tells you which choice mattered is an experiment that pays for itself on the next problem.
Knowledge check
Final check
Finish the article by checking the ideas you just learned.
References
Research updated Sep 9, 2026


